Camera Setting
The Camera Setting page provides settings to adjust the video feed image.
The Camera Setting page is accessed by selecting: in the Navigation pane.
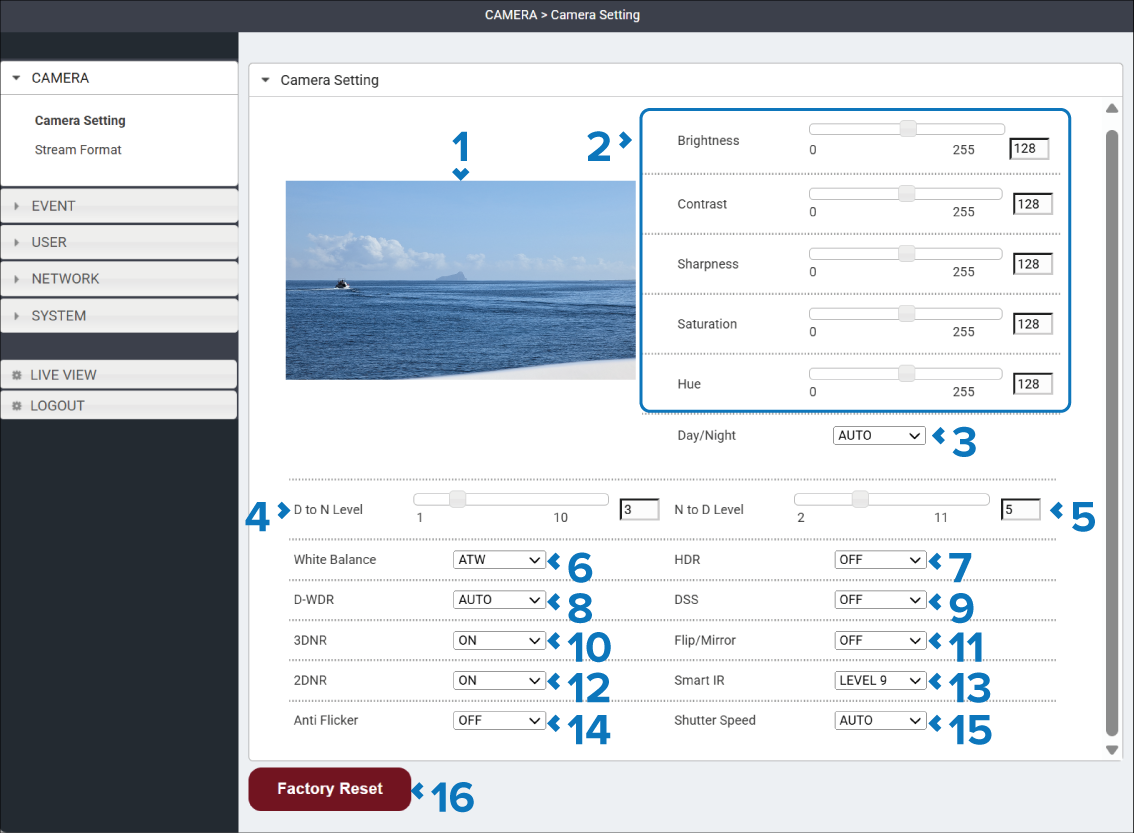
Description |
|
|---|---|
1 |
Live view The live video from the camera is displayed. |
2 |
Basic Image Settings The basic image settings include: Brightness, Contrast, Sharpness, Saturation, and Hue. Use the slider controls to adjust the individual settings. The default values are 128 and can be adjusted from 0 to 255. |
3 |
Day/Night drop down AUTO is the default value which will automatically switch between day and night mode based on the thresholds set in the D to N Level and N to D Level settings. The Day/Night settings can also be set to COLOR day mode or B/W infrared night mode. When set to COLOR or B/W the camera will not switch modes automatically when lighting conditions change. |
4 |
D to N Level slider Sets the light level threshold at which the camera automatically switches from COLOR day mode to B/W infrared night mode.
|
5 |
N to D Level slider Sets the light level threshold at which the camera automatically switches back from B/W infrared night mode to COLOR day mode.
|
6 |
White Balance The White Balance is set to ATW Auto Tracking White and cannot be changed. |
7 |
HDR drop down The HDR High Dynamic Range setting improves visibility in scenes with significant variations in brightness by enhancing detail in both dark and bright areas of the image. Higher settings apply a stronger enhancement effect. The available options are:
|
8 |
D-WDR drop down The D-WDR Digital Wide Dynamic Range setting digitally brightens dark areas and reduces overexposed areas to improve visibility in high-contrast scenes. The available options are:
|
9 |
DSS drop down The DSS Digital Slow Shutter setting increases the camera's exposure time in low-light conditions to produce a brighter image. Higher settings provide greater low-light sensitivity but may increase motion blur when objects or the camera are moving. The available options are:
|
10 |
3DNR drop down The 3DNR 3-Dimensional Noise Reduction setting reduces image noise by analyzing differences between consecutive video frames. The available options are:
This setting can improve image quality in low-light, reduce video bitrate and storage requirements. |
11 |
Flip/Mirror drop down The Flip/Mirror setting changes the orientation of the video image to suit different mounting positions and viewing requirements. The available options are:
|
12 |
2DNR drop down The 2DNR 2-Dimensional Noise Reduction setting reduces image noise by analyzing image noise within a single frame. The available options are:
|
13 |
Smart IR drop down The Smart IR setting automatically adjusts infrared LED brightness to prevent close objects from appearing overexposed at night. Higher levels provide stronger IR compensation This setting helps maintain consistent image brightness at varying distances. The available options are:
|
14 |
Anti Flicker drop down The Anti Flicker setting reduces image flicker caused by mains-powered lighting. If flickering is experienced select the relevant setting for your region. The available options are:
|
15 |
Shutter Speed drop down The Shutter Speed setting controls how long the camera's image sensor is exposed to light. Faster shutter speeds reduce motion blur but require more light. Slower shutter speeds increase brightness but may introduce motion blur. AUTO allows the camera to select an appropriate shutter speed automatically. The available options are:
The manual shutter speed selection specifies the amount of time each video frame is exposed to light. For example: the 1/30 setting will expose each video frame to light for one-thirtieth of a second. |
16 |
Factory Reset button Selecting the Factory Reset button will reset the Camera settings to their factory default values. |