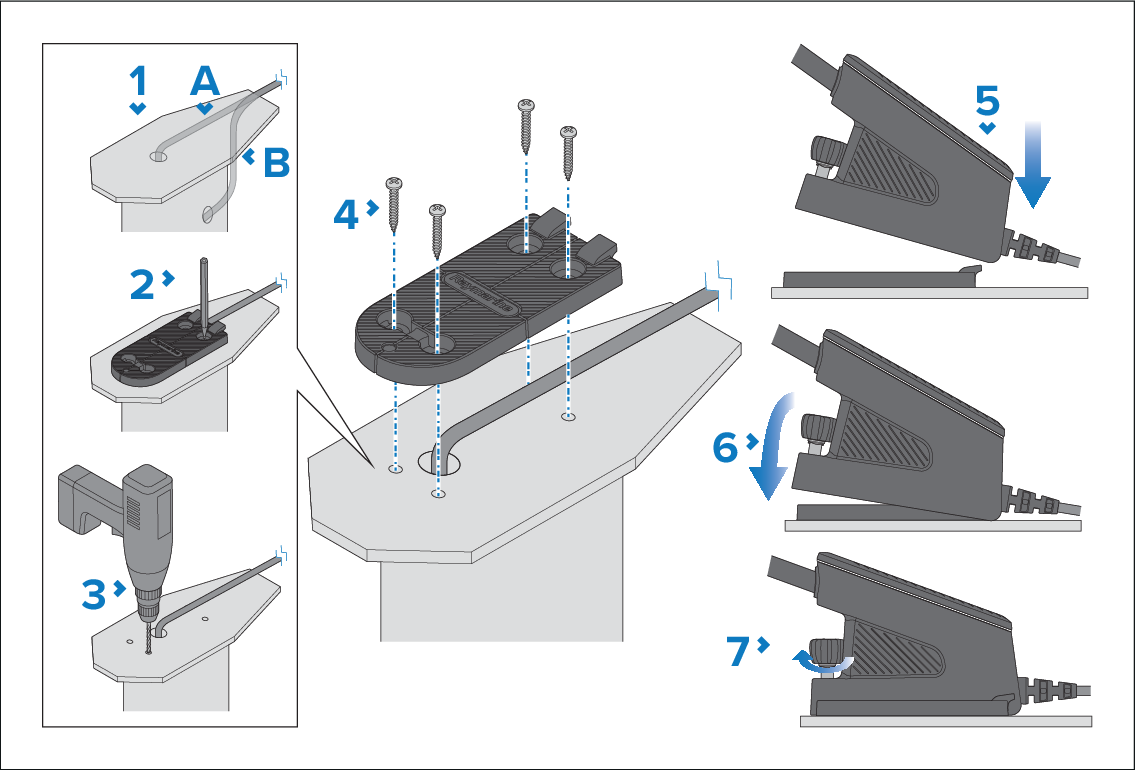
Mounting the wind transducer

Procedure for mounting the wind transducer.

Pre-requisites:

  • Ensure that you have followed the location requirements guidance when choosing your mounting location.

  • The unit must be mounted on a horizontal surface. If the mounting surface is not horizontal, create a wedge piece to make the surface horizontal.

  • Ensure that the provided fixings are suitable for the mounting surface material and thickness.

Note

Only self-tapping mounting screws are provided with the product, as it is not assumed that the installer will have the specialist thread-tapping tools required to drill and tap holes in an aluminium mast. However, in cases where this is possible, the preferred mounting method is to drill and tap 4 mounting holes, and then to use 4x M5 machine screws (not supplied) to secure the mounting plate. Ensure that all stainless steel screws in the aluminium mast are fitted using an anti-corrosive jointing compound (e.g. Duralac).

Installation Wind transducerMounting Wind transducer

  1. Route the mast cable from the top of the mast to the gateway’s intended position:

    Cable routing option

    A

    If you are routing the cable through an exit located under the mounting plate, the cable should be fitted into the cable channel on the bottom of the mounting plate, and then routed down the exit.

    B

    If you are routing the cable through an exit located on the side of your mast, the cable should instead be fitted around the base of the mounting plate, and then routed down the exit.

  2. Use either the mounting plate as a guide or use the supplied mounting template to mark the hole locations on the mounting surface.
  3. Drill 4 pilot holes at the marked locations.
    Important
    • Additional care needs to be taken when drilling the correct size pilot hole to ensure that the screw can cut a thread in the aluminium mast.

    • Pilot hole sizes must be suitable for the material type and thickness of the mounting surface (e.g.: a 4.1 mm (532) to 4.7 mm (3/16 in) drill bit should be used when mounting on an aluminium surface).

  4. Secure the mounting plate to the mounting surface using the fixings.

    Tighten to a torque of 3.5 N·m (2.58 lbf·ft).

  5. Position the wind transducer over the mounting plate, ensuring the tabs on the rear of the mounting plate are inserted into the recesses on the rear of the wind transducer base.
  6. Push the wind transducer forward and down onto the mounting plate.
  7. Secure by tightening the thumb screw until the transducer is secure on the mast plate; after tightening there should be no movement. Ensure adequate tightening of the thumb screw, initially by hand and then further using the thumb screw’s hex head and the supplied 3 mm A/F Hex wrench (Allen key). Do not over-tighten. (The same method can also be used in reverse for subsequent thumb screw removal, if required).