LED Diagnostics

Your product has diagnostic LEDs which can be used to identify the unit’s status and to help troubleshoot any potential issues that may occur.

In order to view the transducer LED status indicators, you need to open the top cover of the converter. For information on how to remove the front cover, refer to: Mounting

Important

Do not touch exposed transducer wires whilst the converter is powered on and the cover is open.

LED diagnostics
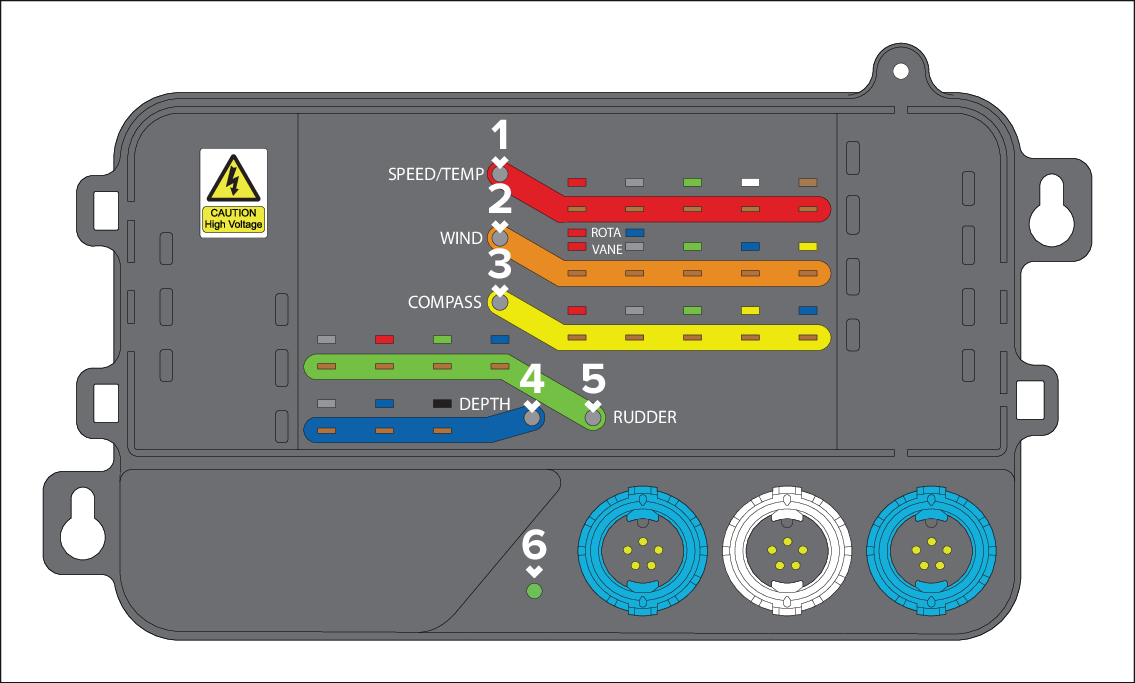
Transducer LEDs (1–5):

LED Indication

LED Status and applicable solutions

Powered up / Ok:

Normal operation — no user action is required.

No power:

  • Check the unit’s connector for broken or bent pins.

  • Check the cable and connectors for signs of damage or corrosion, replace if necessary.

  • With the unit turned on, try flexing the power cable to see if this causes the unit to re-boot/lose power, replace if necessary.

(Speed and temperature / Wind vane transducer only) Vessel speed pulse time-out:

  • Check that the transducer has been installed in accordance with the instructions provided with the transducer.

  • Check the unit’s connector for broken or bent pins.

  • Check the cable and connectors for signs of damage or corrosion, replace if necessary.

  • With the unit turned on, try flexing the power cable to see if this causes the unit to re-boot/lose power, replace if necessary.

  • Check the cable junction box (usually located at the bottom of the mast) for damage and corrosion, and ensure that connections are clean and secure. Repair and replace as necessary.

  • (Wind vane only) Disconnect the wind vane arm and check arm and base connectors for damage and corrosion. Ensure that they are clean and secure, and repair and replace as necessary.

(Depth transducer LED only) Searching for lock:

  • Check that the transducer has been installed in accordance with the instructions provided with the transducer.

  • If the transducer angle is too great the beam can miss the bottom, adjust transducer angle and recheck.

  • If the transducer has a kick-up mechanism, check that it has not kicked up due to hitting an object.

  • Check transducer condition, ensuring it is not damaged and is free from debris/fouling. If necessary, clean or replace your transducer. After cleaning or replacement coat the transducer using a water-based anti-fouling paint.

  • Consider contacting your local dealer or Raymarine® Product Support. For Raymarine® Product Support contact details, refer to the following section: Raymarine product support and servicing

Lost valid signal:

  • Check the unit’s connector for broken or bent pins.

  • Check that the cable connector is fully inserted into the unit and that the locking collar is in the locked position.

  • Check the cable and connectors for signs of damage or corrosion, replace if necessary.

  • With the unit turned on, try flexing the power cable near to the display connector to see if this causes the unit to re-boot/lose power, replace if necessary.

Not connected:

  • Check the unit’s connector for broken or bent pins.

  • Check that the cable connector is fully inserted into the unit and that the locking collar is in the locked position.

  • Check the cable and connectors for signs of damage or corrosion, replace if necessary.

  • Consider contacting your local dealer or Raymarine® Product Support. For Raymarine® Product Support contact details, refer to the following section: Raymarine product support and servicing

SeaTalk NG LED (6):

LED Indication

LED Status and applicable solutions

Powered up / Ok:

Normal operation — no user action is required.

No power:

Refer to the advice found within the following section: Power up troubleshooting

Software download:

Normal operation — no user action is required.

Low bus voltage:

  • Check the unit’s connector for broken or bent pins.

  • Check that the cable connector is fully inserted into the unit and that the locking collar is in the locked position.

  • Check the cable and connectors for signs of damage or corrosion, replace if necessary.

  • With the unit turned on, try flexing the power cable to see if this causes the unit to re-boot/lose power, replace if necessary.

  • Check the vessel’s battery voltage and the condition of the battery terminals and power supply cables, ensuring connections are secure, clean and free from corrosion. Replace if necessary.

  • With the product under load, using a multi-meter, check for high voltage drop across all connectors / fuses etc, and replace if necessary.

No communications / fault: