The Power supply module is supplied with the Master module
and Remote modules, and provides power to the system and connected
devices.
Note
An appropriately-rated 2-core power cable is required.
Power supply moduleConnectionsPower supply
Ensure the power supply source is switched off.
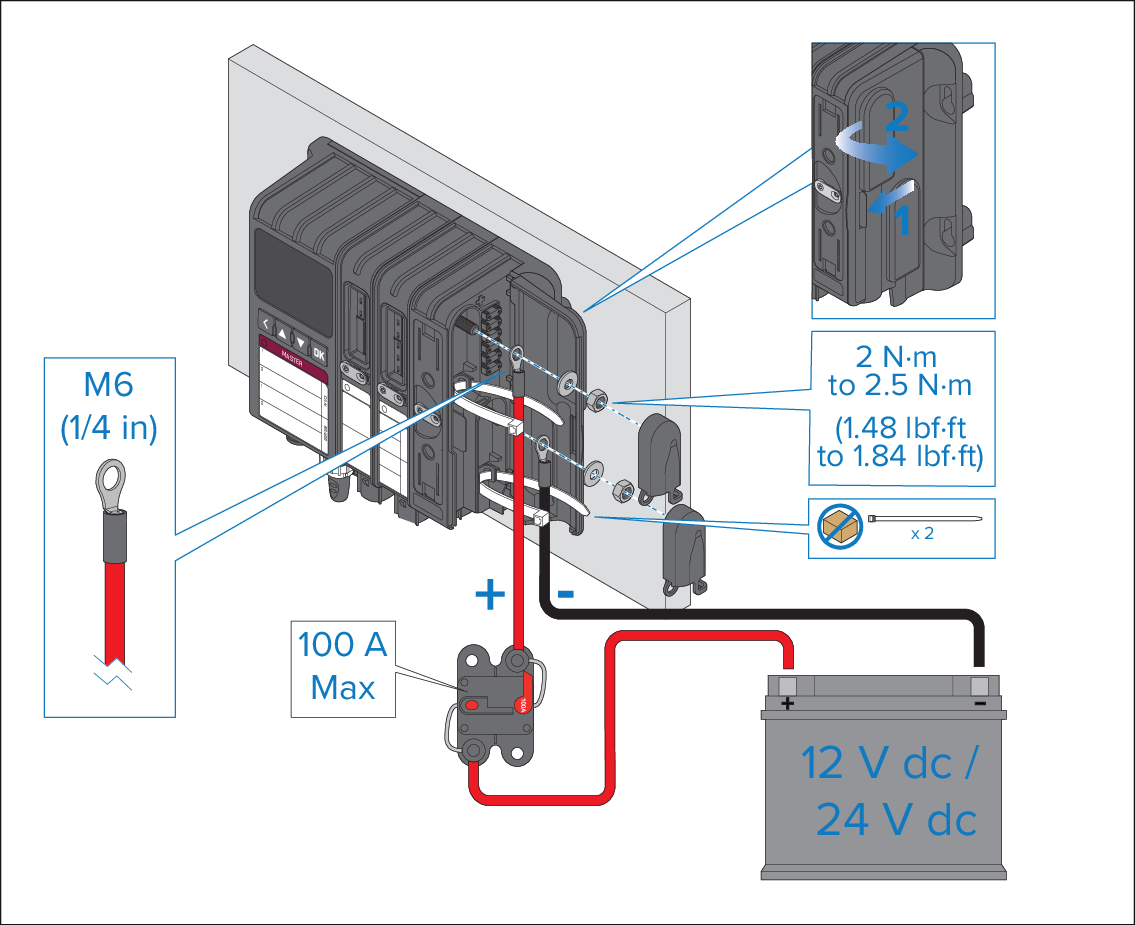
Open the door on the side of the Power supply module by
pulling the tab forwards whilst opening the door.
Remove the protective covers from the power connection
studs, leaving them attached to the Power supply module.
Note
The protective covers are attached to the Power supply
module by lanyards. Do NOT disconnect the protective covers from the
Power supply module.
Remove the nuts and washers from the power connection studs.
Feed cable ties (not supplied) through the cable tie slots.
2 x cable ties up to 5 mm x 1 mm in size can be used.
Crimp M6 (1/4 in) ring crimps to the end of the positive
and negative power supply cables.
An appropriately sized cable should be used, based on the
system’s current draw and distance from the power source.
Slide the power cable’s ring crimps over the power connection
studs and secure using the washers and nuts. The nuts should be tightened
to a torque of 2 to 2.5 N·m (1.48 to 1.84 lbf·ft), using a torque
wrench and 10 mm (1/2 in) socket.
Note
To prevent potential damage to the module, do not over-tighten
the fixings.
Secure power cables using the cable ties, and then trim
cable tie ends.
Apply silicone or copper grease to the exposed power connections.
Note
Do NOT use mineral-based greases or anti-seize (such
as Denso paste), as this can damage the module’s plastic housing.
Replace protective covers and close the Power supply module
door.
Use an appropriately-rated waterproof thermal circuit breaker
or inline fuse (100A maximum), fitted to the positive power supply cable.
Important
Do NOT switch on the power supply
until ALL fuses have been checked and fitted.